Posts

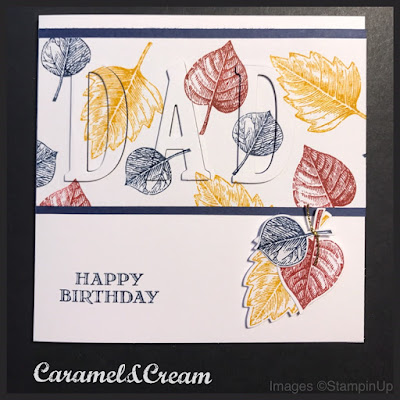
Happy Birthday - DAD
Image
I finally ordered the 'large letter' framelits and i am not disappointed! I will apologise in advance as i can see a lot of cards being made using these in the near future.  For this card i chose the 'Vintage Leaves' stamp set and the colours from the Regals inks, 'Night of Navy', 'Crushed Curry' and 'Cherry Cobbler'. Randomly stamping over some whisper white card stock with 3 of the leaves from the stamp set i then used the large letter framelits to cut out the word 'DAD' Next i mounted the stamped card onto some 'Night of Navy' to give a nice border. Once mounted onto my base card i then put back the letters i had cut out using dimensionals to lift the letters away from the background.  I really love the effect this gives and it's so versatile you can create any wording you wish along with any stamped images.  I'd love to see your cards if you give it a try. Rachael x

Slide Back Saturday - Candy Cane Lane

Image
I love Stampin Up designer series papers and i'm always really sad when a particular suite is no longer available. The 'Candy Cane Lane' papers were really lovely and a nice change from the full on traditional green and red. They also matched perfectly with the 'Cookie-Cutter Christmas' stamp set.  Using 4x4 card blanks i covered them fully in dsp. Using the gingerbread man and the reindeer i stamped them onto kraft card using 'soft suede' ink.  To cut these out with minimum fuss Stampin Up also gave us a matching punch...did you notice the reindeer was the same shape flipped upside down? Clever huh! Pop them on some dimensionals and add to the card. Lastly a sentiment from the 'Oh What Fun' stamp set was stamped in 'Real Red' and punched out using the 'Classic Label' Punch. Another label in 'Real Red' cardstock was added behind to give a break between the dsp and sentiment. I had some red sequins handy so add...

Christmas stamps for a non Christmas project!

Image
A lady in a team i belong to set us 'Simply Stylish Stampers' a challenge to create a project using a Christmas stamp set. Easy peasy i know you're thinking.... except it had to be used for a non Christmas project. I chose to use the cute teddy from the 'Cookie-cutter Christmas' stamp set.  For the background i took the stamp set 'Happy Birthday Gorgeous', using 2 of the little flowers i randomly stamped in 'Crumb Cake' and 'Sweet Sugarplum' ink.  The balloons and sentiment are also from the 'Happy Birthday Gorgeous' stamp set.  Next i stamped out the teddy in 'Soft Suede' and gave it a cute bow in 'Sweet Sugarplum' to match.  I think it makes a really sweet congratulations card to welcome a new baby.  If you would like to order any Stampin Up products please do not hesitate to get in touch on rachhome@msn.com or you can order direct yourself 24/7 using my online shop. Links at the top of my page...

Tree rings background

Image
Sometime it's nice to have a change from using designer series papers as a background for your cards. This is where the brilliant full size background stamps from Stampin Up come in. I've taken the 'Tree Rings' stamp and inked it using 'Soft Suede', the beauty of it being a stamp is that you can choose any ink colours to match your projects and you're not limited to the colours in a dsp pack.  I thought the 'Foxy Friends' stamp set would match the background perfectly, the cute little creature in his natural surroundings.  The trees are stamped in 'Garden Green' The tree stump 'Soft Suede' to match the background. The fox in 'Calypso Coral' with 'Basic Black' for his face details and legs.  Lastly 'Cherry Cobbler' for the sweet hearts sign.  I like the way the fox has his head cocked slightly to the side, my dog does this when she is hoping for a treat!  If you would like to order...

Slide Back Saturday - cookie-cutter Halloween

Image
As we are about to hit October I thought a project involving Halloween would be good. This card uses the 'Cookie-Cutter Halloween' stamp set (and the matching punch). To update it slightly i have added some of the new dsp from 'Spooky Night' and also the sentiment comes from the 'Spooky Cat' stamp set which i simply punched out using the 'classic label punch'  The base card is 5x5 inches and simply covered with dsp.  Next a layer of 'whisper white' measuring 4x4 was added. Cutting another square of 'whisper white' this time measuring 3x3 inches i then sliced it on the trimmer at random angles.  Flipping the pieces so they didn't quite line up again i used a sponge to 'dirty' the paper with 'Crumb Cake' ink for an aged bandage look. (doesn't show as good on the photo as it does in real life) The mummy image was stamped using 'basic black' ink before being sponged lightly with some ...

Loyal and True with the Best Badge punch

Image
For todays project i have gone back to the annual catalogue.  It's easy to get caught up with the excitement of Christmas projects and we forget some of the gorgeous products we have available all year round. 'Loyal and True' is mainly aimed at servicemen or woman but it could also be just to tell someone how proud you are of them. Maybe they have a new job, passed an exam etc.  I have used a 5x5 inch card blank in whisper white then taken some dsp from the 'colour theory' paper stack to layer on top. Choosing coordinating inks i then stamped over some kraft card using the little star stamp from the 'Loyal and True' stamp set.  Using the 'Best Badge' punch to cut these out and also the stamped loyal and true sentiment gives the perfect shape with minimum fuss. A strip of ribbon folded is glued between the badges to give some added interest.  The first card uses 'Dapper Denim' and 'Real Red' as the main colours...

Eclipse technique

Image
I've been wanting to try the 'eclipse technique' for ages after seeing lots of different designs from fellow crafters. I don't currently have the big letter dies so i decided i would give it a go with the large numbers instead. I've chosen the 'Cheers to the Year' stamp set and taken both of the snowflake stamps. The larger i stamped randomly in 'Night of Navy' and the smaller snowflake in 'Smoky Slate' The sentiment i placed in the top corner also stamped in 'Night of Navy' Next i took the numbers and lined them up carefully before running through the big shot. Using a whisper white card blank, layer 'Night of Navy' cardstock that has a length of silver ribbon wrapped around it. Make sure you tie the ribbon before gluing so that it holds everything into place. The beautiful silver embellishment is also from the 'Year of Cheer' suite. Lastly i popped the numbers up on some dimensionals before placi...