Posts

Showing posts from 2017

Happy New Year

Image
Wishing all my customers and those of you who just pop by for a quick look at my blog a very Happy New Year.  I hope 2018 is a great one for you all and I look forward to crafting again with you very soon. Rachael x

Slide Back Saturday - Winter Wonderland dsp. Stampin Up.

Image
Thank you for popping by for another of my Slide Back Saturdays.  I really enjoy doing these because it encourages me to use some of my old stamp sets and papers that otherwise remain gathering dust on my shelves. I know i should sell them once retired but some of them i just can't part with and lets face it, not everyone has the funds to keep changing products. So hopefully for those of you out there that are like me and like to hang onto some of your favourite things this will encourage you to use them too.  Today i have 3 cards all using the same 'Winter Wonderland' designer series papers. This was absolutely my favourite set of Autumn / Winter papers that Stampin Up have ever made.  The first card measures 5x5 inches. I've used a piece of the dsp to cover the card base. Before gluing it to the card i laid across 2 lengths of ribbon / sequin trim and glued it to the back of the dsp with some 'fast fuse' so it would stay in place.  Next i us

Card front builder thinlits - Stampin Up

Image
When i first saw the 'Card Front Builder' thinlits die i must admit it didn't grab me straight away. I think i thought it looked like too much faff so i decided not to order it. Then i made that deadly mistake that most of us crafters do...i went on Pinterest!! Needless to say after spending half an hour (okay maybe 2 hours) browsing the cards made by some of my fellow demonstrators i was convinced i needed it too.  The design i have used was inspired by another Pinterest user 'Stamping Up North', I really liked the way they used the cut out trees to layer back onto the card so decided to make my own version. The background paper is from the 'Be Merry' designer series paper. I thought this particular sheet worked well with the 'Garden Green' and sprinkle of white looking like snow.  I ran a square of 'Whisper White' and the tree die though the big shot then used the cut out trees to mount over the top again but placed at differ

Slide Back Saturday - Merry Tags - Stampin Up

Image
Whilst we are busy concentrating on making cards and buying Christmas presents we often forget that when giving a gift the first thing you look at is the little gift tag. A simple wrapped present can look all the more special with a pretty handmade gift tag. I've chosen the 'Merry Tags' framelits dies, cutting two shapes to make each tag. One is a plain bauble shape the other has a pretty cut out design so when layered in different colour cardstock it allows the underneath to peak through.  The colours chosen here are 'Whisper White' and 'Fresh Fig', what a gorgeous, ,rich colour it is and a break from the traditional reds and greens. Silver 1/8 inch ribbon is the perfect width to slip through the tag top.  To package these in sets of 10 i have taken the 'Bigz Top Note' die, scored it in half so it sits along the top of a clear cello bag. A staple either side ensures the top stays closed and tags won't slip out of the bag.  T

Merry Mistletoe

Image
Keeping it simple is key to not getting stressed if you have lots of Christmas cards to make. This card is super simple and you don't need lots of items. Perfect for the person just starting out in crafting as you don't even need a 'big shot' either! 'Merry Mistletoe' is the stamp set used for the deer and garland. The sentiment comes from 'Merry Patterns', i like this because it's the perfect size to fit into the label punch.  A little red gem from my craft stash is used to give one reindeer his red nose and the gorgeous gold glimmer paper (yes i know i am using this quite a bit...ok well a lot, but it really is fabulous) to give a hint of sparkle.  So easy you could sit and stamp a stack of these in no time at all.  If you fancy having a go yourself and would like to order any Stampin Up products you can do so 24/7 HERE   Any question please do get in touch rachhome@msn.com Rachael x

JOY - with Stampin Up

Image
Are we all feeling excited that tomorrow is the 1st of December? I absolutely love Christmas time, so i really enjoy the whole of December.  This card i made uses the word 'JOY' which sums up how i feel about the festive period. I have made this card using the same dsp but switched the colours around, so one is more 'Cherry Cobbler' and the other more 'Garden Green'.  They are simple to make. Taking a piece of cardstock 9 x 3 inches score on the long side at 3 and 6 inches. This gives you the folds so that it will fit into a 3x3 inch envelope.  The 3 pieces of dsp from the 'Be Merry' papers measure 2 7/8 inch square. This gives you a hint of border around all four sides.  I chose a pattern with mittens on so decided to use the 'Many Mittens' framelits to cut out the 2 mittens and the little tree from the matching stamp set 'Smitten Mittens'  'JOY' i wanted to stand out against the papers so of cou

18th Birthday - Stampin Up large numbers

Image
Hello, just a really quick card to show today as it's my Nephews 18th birthday.  I chose the colours 'Dapper Denim' and 'Lemon Lime Twist' to match the dsp.  Added some sparkle with the 'Gold Glimmer paper' by cutting out 18 using the large number dies. Quick and easy to make and the colours and numbers could be changed to match any age.  If you would like to buy any Stampin Up products please do so HERE   Rachael x

Slide Back Saturday with 'Be the Star' at Christmas - Stampin Up

Image
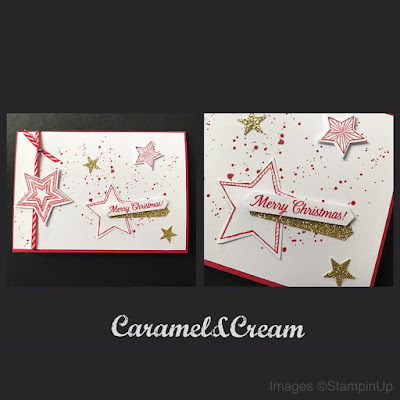
'Gorgeous Grunge' is one of my favourite stamp sets for creating backgrounds. It's a set that i just can't bring myself to get rid of even though it has been retired.  Here i have used the splatter effect in 'Real Red' ink.  The stars stamped in the same colour come from the 'Be The Star' stamp set and are cut using the matching 'Star framelits'....a bonus to save you from having to fussy cut them all. Ribbon in coordinating colours adds interest and i just love our glimmer papers. I seriously can't stop using them on my Christmas projects! Here i have taken the 'Gold Glimmer Paper' and punched out some little stars and a strip to sit behind the sentiment.  I think i will be making lots more of these but in different colours.  If you would like to order any Stampin Up products you can do so HERE   Rachael x

Christening card for my niece.

Image
So if you saw my post yesterday you will know this card was made for my nieces Christening. (If you didn't see yesterdays post pop back and take a look, i shared a cute card made for her adoption day) 'Inspired Events' is the perfect stamp set for those special baby / childrens occasions. It's a photopolymer stamp set so you can see exactly where you are placing the beautiful script wording.  I chose the colour 'Sweet Sugarplum' and just a hint of 'Smoky Slate' for the cross. The gate / border panel effect is so pretty that you really don't need to use too much else with it.  Rose buds are also in the same stamp set, i simply inked up the base flower image first but then stamped off onto some scrap paper to lighten it a shade. I then went back over with the more detailed flower stamp but kept the colour at it's fullest to let the detail stand out.  Once dry i gave a swish over with some 'Wink of Stella' to give a love

Twinkle Twinkle little star.

Image
Some of you may know that recently my baby nieces adoption was finally made official. It's been a long wait but everyone in the family is thrilled that she can now have her permanent family name registered.  I wanted to gift something for her special day so i decided to have a star named after her and of course i needed a card to go along with it too. The 'Moon Baby' stamp set and it's wording 'Twinkle Twinkle little star' seemed so apt for the gift i had chosen.  Pretty floral dsp was used to cover the card base then a layer of 'Whisper White' card cut slightly narrower to give a border at the sides.  I stamped the moon and baby image onto some scrap 'whisper White' card stock first then coloured it in using my aqua pen and inks. Using scissors to fussy cut the image meant i could then mount it on some dimensionals to give some depth to the card.  'Basic Black' ink is used for the wording. Lastly some ribbon and 3 st

Slide Back Saturday - Jingle All The Way

Image
This was a very simple stamp set which included 4 sentiments and a handful of small images such as a snowman, fox, tree etc but it was the matching 'Sleigh Ride Edgelits' die that really gave this set the wow factor. The paper used in this card was from my non Stampin Up stash - it's a bluey kind of grey but any colour would work great with this design. I combined it with 'Whisper White'. It is basically layers of paper / cardstock with a different edgelit run along the top to create the sleigh, houses and trees. 'Jingle all the way' inked in 'Smokey Slate' and a gold star add the finishing touches.  If you would like to order any current Stampin Up products please click HERE  for my online shop available 24/7 Any questions please feel free to email me rachhome@msn.com Rachael x

Peace on Earth

Image
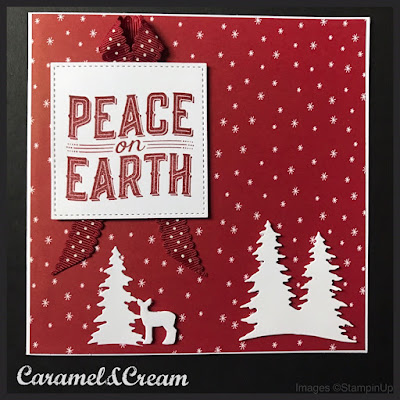
The 'Be Merry Designer' series paper was the inspiration for this card. I love the 'Cherry Cobbler' and 'Whisper White' combination. Taking a sheet of 'Whisper White' cardstock 12 x 6 inches i folded in half to give my 6x6 base. Layer with a sheet of dsp cut a smidgen smaller to give just a hint of the white around the edges.  The sentiment comes from the 'Carols of Christmas' stamp set, stamped in 'Cherry Cobbler' and cut out using the 'Stitched Framelits' A simple silhouette in 'Whisper White' of the trees and deer is made using the 'Card Front Builder' die. If you purchase both the stamp set and die together as a bundle you can save yourself 10% A length of ribbon placed behind the sentiment adds a little more depth and texture to the card.  If you would like to order any Stampin' Up products please do so using my shop available 24/7  HERE Any questions please feel free to email me

Glittery Mitten

Image
Super quick and easy card today. Perfect for beginners with no experience in crafting. I've chosen a piece of dsp from the gorgeous 'Year Of Cheer' and the stamp set 'Smitten Mitten'  Stamping one mitten in gold ink i then cut it out using my 'Big Shot' and the matching framelits dies. The second mitten was cut from our fabulous , sparkling gold 'Glimmer Paper' A small length of ribbon to join the mittens together and pop on your card base and you are done! Of course if you wanted to step up the card you could use mounts or add gold embossing powder to the stamped image, trim on the mittens etc but i wanted to show a card that anyone can make but still catches the eye and looks great for the festive season.  If you would like to order any Stampin Up products or have any questions please do get in touch - rachhome@msn.com Rachael x

Slide Back Saturday - Wildflower Fields

Image
'Wildflower Fields' was such a pretty combination of designs, from really full on floral to more simple and subtle patterns.  The paper chosen here was one of the more decorated pieces so it really didn't need much else to go with it. I took the sentiment from the 'Thankful Thoughts' stamp set and stamped it in the lovely, vibrant 'Calypso Coral' ink. Using cardstock of the same colour i made a little flag using the 'Triple Banner Punch' and simply added it to the lower half of the card.  If you would like to order any Stampin Up products you can do so 24/7 using the links at the top of page. Any questions please feel free to email me rachhome@msn.com Rachael x

Snowflake embossing folder

Image
At Christmas if you are making your own cards and have LOTS to make like i do, then you really know how hard it is to find the time to get them all made. Sometimes keeping things classy and simple is the key. The lovely 'Winter Wonderland Textured Impressions Folder' from the 'Year of Cheer' suite is perfect for adding interest quickly and easily.  Simply running it thought your big shot with your chosen colour of card stock and add small lengths of ribbons and a scattering of 'Rhinestone basic jewels' and you're just about done! Layer onto coordinating cardstock. Finally add your chosen sentiment over the ribbon, i chose this one from the 'Cheers to the Year' stamp set.  Super simple, quick but still lovely.  If you would like to order any Stampin Up products please do to hesitate to get in touch. You can email me direct on rachhome@msn.com or you can shop online 24/7 using my links at the top of my homepage. Rachael x

Slide Back Saturday - Jolly Friends

Image
Slide back Saturday today uses some lovely papers from 'Warmth and Cheer' . The knitted look on some of them gives a really cosy, Winter feel. The big sentiment comes from the stamp set 'Oh What Fun' and i've kept it simple apart from adding a scattering of sequins.  'Jolly Friends' is where the moose comes from, he is fussy cut but his lovely hat, in more paper from the 'Warmth and Cheer' is simply punched out with the punch made to go with the 'Jolly Friends' stamp set.  This card measures 4 x 4 inches, a lovely size if you have lots to make for friends and family as it doesn't use up all of your dsp. The 2 inch strips you get left over from the 6 x 6 paper stacks are great for using on matching gift tags! Any questions please do not hesitate to get in touch, i'd be delighted to help. Fancy becoming a demonstrator for Stampin' Up! yourself? drop me an email to rachhome@msn.com for more information. .  

Happy Birthday - DAD

Image
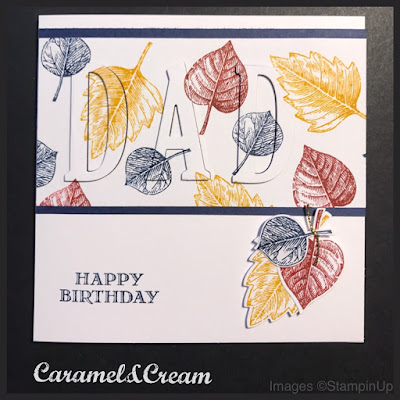
I finally ordered the 'large letter' framelits and i am not disappointed! I will apologise in advance as i can see a lot of cards being made using these in the near future.  For this card i chose the 'Vintage Leaves' stamp set and the colours from the Regals inks, 'Night of Navy', 'Crushed Curry' and 'Cherry Cobbler'. Randomly stamping over some whisper white card stock with 3 of the leaves from the stamp set i then used the large letter framelits to cut out the word 'DAD' Next i mounted the stamped card onto some 'Night of Navy' to give a nice border. Once mounted onto my base card i then put back the letters i had cut out using dimensionals to lift the letters away from the background.  I really love the effect this gives and it's so versatile you can create any wording you wish along with any stamped images.  I'd love to see your cards if you give it a try. Rachael x

Slide Back Saturday - Candy Cane Lane

Image
I love Stampin Up designer series papers and i'm always really sad when a particular suite is no longer available. The 'Candy Cane Lane' papers were really lovely and a nice change from the full on traditional green and red. They also matched perfectly with the 'Cookie-Cutter Christmas' stamp set.  Using 4x4 card blanks i covered them fully in dsp. Using the gingerbread man and the reindeer i stamped them onto kraft card using 'soft suede' ink.  To cut these out with minimum fuss Stampin Up also gave us a matching punch...did you notice the reindeer was the same shape flipped upside down? Clever huh! Pop them on some dimensionals and add to the card. Lastly a sentiment from the 'Oh What Fun' stamp set was stamped in 'Real Red' and punched out using the 'Classic Label' Punch. Another label in 'Real Red' cardstock was added behind to give a break between the dsp and sentiment. I had some red sequins handy so add

Christmas stamps for a non Christmas project!

Image
A lady in a team i belong to set us 'Simply Stylish Stampers' a challenge to create a project using a Christmas stamp set. Easy peasy i know you're thinking.... except it had to be used for a non Christmas project. I chose to use the cute teddy from the 'Cookie-cutter Christmas' stamp set.  For the background i took the stamp set 'Happy Birthday Gorgeous', using 2 of the little flowers i randomly stamped in 'Crumb Cake' and 'Sweet Sugarplum' ink.  The balloons and sentiment are also from the 'Happy Birthday Gorgeous' stamp set.  Next i stamped out the teddy in 'Soft Suede' and gave it a cute bow in 'Sweet Sugarplum' to match.  I think it makes a really sweet congratulations card to welcome a new baby.  If you would like to order any Stampin Up products please do not hesitate to get in touch on rachhome@msn.com or you can order direct yourself 24/7 using my online shop. Links at the top of my page

Tree rings background

Image
Sometime it's nice to have a change from using designer series papers as a background for your cards. This is where the brilliant full size background stamps from Stampin Up come in. I've taken the 'Tree Rings' stamp and inked it using 'Soft Suede', the beauty of it being a stamp is that you can choose any ink colours to match your projects and you're not limited to the colours in a dsp pack.  I thought the 'Foxy Friends' stamp set would match the background perfectly, the cute little creature in his natural surroundings.  The trees are stamped in 'Garden Green' The tree stump 'Soft Suede' to match the background. The fox in 'Calypso Coral' with 'Basic Black' for his face details and legs.  Lastly 'Cherry Cobbler' for the sweet hearts sign.  I like the way the fox has his head cocked slightly to the side, my dog does this when she is hoping for a treat!  If you would like to order

Slide Back Saturday - cookie-cutter Halloween

Image
As we are about to hit October I thought a project involving Halloween would be good. This card uses the 'Cookie-Cutter Halloween' stamp set (and the matching punch). To update it slightly i have added some of the new dsp from 'Spooky Night' and also the sentiment comes from the 'Spooky Cat' stamp set which i simply punched out using the 'classic label punch'  The base card is 5x5 inches and simply covered with dsp.  Next a layer of 'whisper white' measuring 4x4 was added. Cutting another square of 'whisper white' this time measuring 3x3 inches i then sliced it on the trimmer at random angles.  Flipping the pieces so they didn't quite line up again i used a sponge to 'dirty' the paper with 'Crumb Cake' ink for an aged bandage look. (doesn't show as good on the photo as it does in real life) The mummy image was stamped using 'basic black' ink before being sponged lightly with some '

Loyal and True with the Best Badge punch

Image
For todays project i have gone back to the annual catalogue.  It's easy to get caught up with the excitement of Christmas projects and we forget some of the gorgeous products we have available all year round. 'Loyal and True' is mainly aimed at servicemen or woman but it could also be just to tell someone how proud you are of them. Maybe they have a new job, passed an exam etc.  I have used a 5x5 inch card blank in whisper white then taken some dsp from the 'colour theory' paper stack to layer on top. Choosing coordinating inks i then stamped over some kraft card using the little star stamp from the 'Loyal and True' stamp set.  Using the 'Best Badge' punch to cut these out and also the stamped loyal and true sentiment gives the perfect shape with minimum fuss. A strip of ribbon folded is glued between the badges to give some added interest.  The first card uses 'Dapper Denim' and 'Real Red' as the main colours

Eclipse technique

Image
I've been wanting to try the 'eclipse technique' for ages after seeing lots of different designs from fellow crafters. I don't currently have the big letter dies so i decided i would give it a go with the large numbers instead. I've chosen the 'Cheers to the Year' stamp set and taken both of the snowflake stamps. The larger i stamped randomly in 'Night of Navy' and the smaller snowflake in 'Smoky Slate' The sentiment i placed in the top corner also stamped in 'Night of Navy' Next i took the numbers and lined them up carefully before running through the big shot. Using a whisper white card blank, layer 'Night of Navy' cardstock that has a length of silver ribbon wrapped around it. Make sure you tie the ribbon before gluing so that it holds everything into place. The beautiful silver embellishment is also from the 'Year of Cheer' suite. Lastly i popped the numbers up on some dimensionals before placi

Foxy Friends

Image
How super cute is the 'Foxy Friends' stamp set? 29 photopolymer stamps in this set giving you plenty of options to create different looks.  I've taken one of the tree images and stamped it a couple of times before cutting out.  The little fox himself is stamped in 'Calypso Coral' then cut out using the matching 'Fox Builder' punch. I used dimensionals under the head to give it a more 3D effect. 'Basic Black' ink is used for the face details.  For the background i used a couple of things, firstly the base layer is from the 'Wood textures designer series paper stack'. Lovely wood grain effect images for that natural / rustic look.  The second layer i used some cardstock and run it through the big shot with the 'Woodland embossing folder' creating these realistic tree impressions.  A twist of gold trim and a scattering of gold sequins add the finishing touch.  No sentiment added means this card is perfect for lots of d

Slide Back Saturday - By The Tide

Image
Today i have a fishy themed slide back Saturday and that is because this morning we had some beautiful discus fish arrive for our aquarium fish tank. My partner and both sons keep tropical fish, each with their own tank....infact my eldest son has 2 tanks in his bedroom. My dad says we could start our own seaworld up and invite people in haha! Anyway they were the reason i decided to choose this project from some time ago to show you. It uses the retired  'By The Tide' stamp set. Simple to make, stamping off the seaweed to create lighter and darker shades then choosing more vibrant colours for the fish. I chose 'Dapper Denim' and 'Calypso Coral' for these 2 cards. The fish are fussy cut but really don't take long at all.  Great for children but also mens cards too.  Here are a couple of photos of some of our new fish, such pretty colours. If you would like to order any Stampin Up products you can do so using the links top lef